Vue2 知识点
数据传递
- provide、inject
语法:
javascript
provide: Object | () => Object
inject: Array<string> | { [key: string]: string | Symbol | Object }
1
2
2
响应式原理
为了监测数组的变化,须按照下面要求进行数据修改:
- 数据删除/修改数组长度:
this.list.splice(length) - 数据修改:
this.$set(this.list, indexOfItem, newValue)this.list.splice(indexOfItem, 1, newValue)
为了监测对象的变化,须按照下面要求进行数据修改:
- 修改一个属性:
this.$set(this.currentForm, formItem, newValue) - 修改多个属性:
this.currentForm = Object.assign({}, this.currentForm, { xxx }
当使用修改原数组的方法时,可以检测到数组的变化(响应式):push、pop、unshift、shift、splice、sort、reserve
computed操作
- computed传入参数
解释:正常的computed变量,直接传入变量名称即可(就会return 一个返回值过来),若想要传入参数,则里面需要再嵌套一个函数
vue
computed: {
  getCurrentPerson () {
    return (personId) => {
      return this.persons[personId]
    }
  }
}

<!-- html中使用 -->
<el-form v-model="getCurrentPerson(21)"></el-form>
1
2
3
4
5
6
7
8
9
10
2
3
4
5
6
7
8
9
10
vuex基本操作
注意:
- vuex的数据更新必须遵守vue的响应规则
操作流程如下:
vue
state: {
  count: 0
},
getters: {
  getCount: (state, payload) => {
    return state.count
  }
},
// 同步请求使用mutations
mutations: {
  SET_COUNT (state, payload) => {
    state.count += payload.count
  }
},
// 异步请求使用actions
actions: {
  asyncSetCount ({ commit, state }, payload) => {
    commit('SET_COUNT', payload)
  }
}
1
2
3
4
5
6
7
8
9
10
11
12
13
14
15
16
17
18
19
20
2
3
4
5
6
7
8
9
10
11
12
13
14
15
16
17
18
19
20
vue
// 直接访问
this.$store.state.count
this.$store.getters.getCount
this.$store.commit('xxx', payload)
this.$store.dispatch('xxx', payload)


// 导入访问
import { mapState, mapGetters, mapMutations, mapActions } from 'vuex'

computed: {
  ...mapGetters({
    // 和mapState类似
  })
  ...mapState({
    count: state => state.count,
    countAlias: 'count',
    // 使用this
    comCount (state) {
      return state.count + this.localCount
    }
  })
}

methods: {
  // mapActions和mapMutations类似
  // 此时:this.setCount等同于this.$store.commit('setCount')
  ...mapMutations([
    'setCount'
  ]),
  // 或者
  ...mapMutations({
    add: 'setCount'
  })
}
1
2
3
4
5
6
7
8
9
10
11
12
13
14
15
16
17
18
19
20
21
22
23
24
25
26
27
28
29
30
31
32
33
34
35
2
3
4
5
6
7
8
9
10
11
12
13
14
15
16
17
18
19
20
21
22
23
24
25
26
27
28
29
30
31
32
33
34
35
基本用法
vue获取事件对象的方式:
- 设置
@click='getData':不带括号时,默认第一个参数是事件对象 - 设置
@click='getData($event)':带括号时,需显式传入事件对象$event
v-model原理:
- 使用组件时:
v-model="value"<=>value="value" @input="value = $event":value.sync="value"
- 组件内部:
<input :value="value" @input="onInput">props: ['value']- 第一种方式:
onInput (e) { this.$emit('input', e.target.value)};第二种方式:onInput (e) { this.$emit('update:value', e.target.value)}
组件通信
组件通信的方式:
- 🥭父传子:
props:父子组件传值,父组件需绑定传入的props,子组件须在props变量中声明传入的props$attrs:当父子组件传值时,子组件未使用props声明的变量,将统一归纳到$attrs当中$refs:父子传值,父组件设置ref属性,可通过ref属性获取子组件的this(包括子组件的数据和方法)$children[index]:其中$children访问的是当前组件的所有子组件,可通过索引来访问特定的子组件
- 🥝子传父(通过事件监听):
$emit:子组件通过$emit将值传入到父组件中,父组件通过事件进行接收- 通过绑定一个函数传入到子组件中,然后执行该props触发父组件方法
- 通过$parent
- 🍍兄弟传值:
- 使用$on和$emit和$off,结合中间件bus(详情见components/getProsp)
- 🍊祖孙传值:
- provide(祖组件使用,和data类似)和inject(孙组件使用,和props类似);此方法仅需在祖组件中使用provide,在需要该值的后代组件中使用inject即可
- $attrs(中间组件使用,通过属性形式,
v-bind='$attrs',这样中间组件的子代能够访问中间组件父组件的数据)和$listeners(中间组件使用,通过事件形式,v-on='$listeners',这样中间组件的父代能够监听中间组件子组件触发的事件),是props和$emit的增强版;此方法需要层层使用该属性
- 🍋任意组件传值:
- 事件总线(实现见下)
- vuex
注意:
- 组件定义的标签属性,当未使用bind绑定时,代表一个常量字符串,使用bind绑定时表示一个变量
javascript
// 🥭
// 1. props传值
// 父组件
<Child :msg='message'/>
// 子组件
props: ['msg']

// 2. $attrs
// 父组件
<Child msg='message'/>
// 子组件使用:
this.$attrs.msg

// 3. $refs
// 父组件
<Child ref='child'/>
this.$refs.child.xx = 'xxx'
this.$refs.getMethods()
// 子组件
data () {
  return {
    xx: 'hhh'
  }
},
methods: {
  getMethods () {}
}

// 🥝
// 子传父:通过$emit
// 父组件:
<Child @getChild='getChild'/>
getChild (data) {
  // ....
}
// 子组件:
this.$emit('getChild', { a: 1, b: 2 })

// 🍋
// 事件总线的实现
class Bus {
  constructor () {
    this.callbacks = {}
  }
  $on (name, fn) {
    // 一个事件可以有多个监听回调
    this.callbacks[name] = this.callbacks[name] = []
    this.callbacks[name].push(fn)
  }
  $emit (name, args) {
    if (this.callbacks[name]) {
      // 遍历监听并执行回调函数
      this.callbacks[name].forEach(cb => cb(args))
    }
  }
}

// 实践中直接使用Vue的实例代替即可
export default new Bus
1
2
3
4
5
6
7
8
9
10
11
12
13
14
15
16
17
18
19
20
21
22
23
24
25
26
27
28
29
30
31
32
33
34
35
36
37
38
39
40
41
42
43
44
45
46
47
48
49
50
51
52
53
54
55
56
57
58
59
2
3
4
5
6
7
8
9
10
11
12
13
14
15
16
17
18
19
20
21
22
23
24
25
26
27
28
29
30
31
32
33
34
35
36
37
38
39
40
41
42
43
44
45
46
47
48
49
50
51
52
53
54
55
56
57
58
59
插槽
- 🍀匿名插槽
- 🍅具名插槽
- 🍌作用域插槽:数据在子组件中,需要使用到子组件的数据时使用该插槽
javascript
// 1.🍀 匿名插槽
// 内部组件child
<p>
  <slot>abc</slot>
<p>
// 使用内部组件
<child>def</child>

// 2. 🍅具名插槽
// 内部组件
<p>
  <slot>abc</slot>
  <slot name="content"></slot>
</p>
// 使用内部组件
<child>
  <template v-slot:default>
    具名插槽
  </template>
  <template v-slot:content>
    内容content...
  </template>
</child>

// 🍌作用域插槽
// 内部组件
<p>
  <slot>abc</slot>
  <slot name="content" :age="age"></slot>
</p>

data () {
  return {
    age: 45
  }
}
// 使用内部组件
<child>
  <template v-slot:default>
    具名插槽
  </template>
  <template v-slot:content="{ age }">
    年龄:{ age }
  </template>
</child>
1
2
3
4
5
6
7
8
9
10
11
12
13
14
15
16
17
18
19
20
21
22
23
24
25
26
27
28
29
30
31
32
33
34
35
36
37
38
39
40
41
42
43
44
45
2
3
4
5
6
7
8
9
10
11
12
13
14
15
16
17
18
19
20
21
22
23
24
25
26
27
28
29
30
31
32
33
34
35
36
37
38
39
40
41
42
43
44
45
组件构建
- 在使用组件时,若不想一个个使用props,可使用$attrs继承所有属性
- 防止属性在组件内部的根上也有该属性,可在组件内部使用inheriteAttrs:false(和data同级)
- 表单组件构建时,可使用第三方校验库
实战
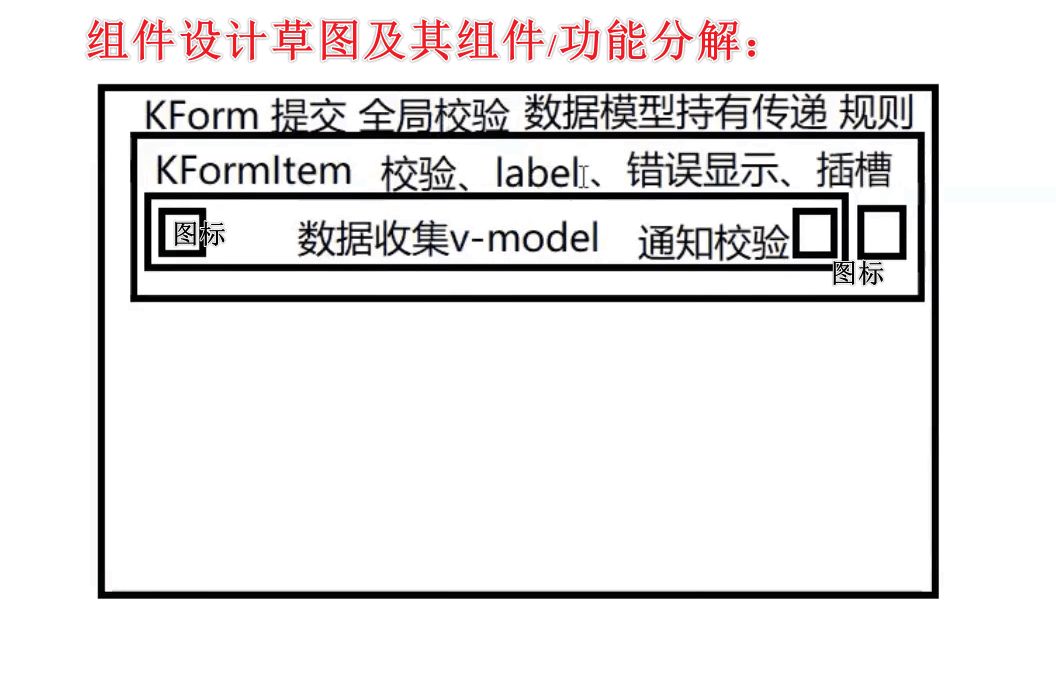
实现一个element 表单
需求分析:
实现功能要点:
- 数据收集:输入框、下拉选择框、单选框
- 校验:单项校验(比如blur时)、全局校验(比如submit时)
- 提交:提交事件
组件设计草图: 
实现:
输入框KInput所需功能:
- v-model
- 通知校验
输入项KFormItem所需功能:
- 插槽
- 展示label、error
- 校验